Core Fruition

GCD in Swift: It Just Works

With the awesome announcement of Swift last week, alongside all of the other incredible announcements, I’m sure that your reaction was similar to mine: Where do I begin?!

I’ve been reading the book, watching the sessions, checking out the sample code, and basically trying to orient myself with the new syntax as much as possible.

One question I had today while listening to the latest episode of the Debug podcast was, “How will Grand Central Dispatch (GCD) work in Swift? Will GCD work in Swift?” With that question in mind I settled in, opened Xcode, and chose File > New > Project…

I chose a Single View Application since I wouldn’t need much of app to answer my question. I named it SwiftlyGCD and chose Swift as the language. I opened ViewController.swift and started typing out dispatch to see what would code-complete. Happily all of the wonderful GCD methods that we know and love appeared in the code-completion list in their Swift-equivalent notation.

For instance, dispatch_async() in Objective-C looks like so:

1
void dispatch_async(dispatch_queue_t queue, dispatch_block_t block);

Whereas in Swift it appears like this:

1
func dispatch_async(queue: dispatch_queue_t!, block: dispatch_block_t!)

As you can see we get a one for one translation from C to Swift thanks to Xcode 6. Additionally we get some extra niceties like named parameters. What does the code look like in usage?

1
2
3
  dispatch_async(dispatch_get_main_queue(), {
      println("Currently dispatched asynchronously")
      })

The call to dispatch_get_main_queue() is exactly the same as we’re used to, while the block syntax is simplified to just a pair of {}.

Bottom line: GCD is fully available in Swift and works exactly as we’d expect. Way to go Apple!

UPDATES

After this post went live on Twitter Jacob Gorban replied and said, “It should even work with trailing block, no?”

He’s right! You can write the above dispatch like so:

1
2
3
  dispatch_async(dispatch_get_main_queue()) {
      println("Currently dispatched asynchronously")
      }

Sponsoring the WWDC 2013 Photo Walk

If you haven’t heard, the second annual WWDC Photo Walk is set for Wednesday June 12th at 6:15 PM. If you’d like to sponsor the walk I’d love to have you on board. Now you may be asking yourself, “Sponsorship? What costs are associated with a photo walk?” Well that’s the beauty of it, there are none! Sponsorship in this case means having your product or company name listed in the walk details, promoted on the WWDC Photo Walk Twitter account, and promoted within the WWDC Photo Walk Glassboard in exchange for some promo codes or discounts given out to the walk participants.

For instance, last year we had 500px sponsor us with one Awesome and one Plus account for the two folks whose photos were the best.

So if you’re interested please send me an email at michael at this domain and we’ll get the ball rolling.

WWDC 2013 Photo Walk

[Updated] Last week I put out the call for sponsors and OMGWTFBBQ did people respond. Check out the great list of sponsors for this year’s walk, in alphabetical order:

1Password

1Password

The fine folks at AgileBits have offered up a free copy of 1Password for Mac to each walk participant. 25 lucky folks will also receive a promo code for 1Password for iOS.

If you’re not able to attend the walk AgileBits is currently running a 50% sale, so get it while it’s hot!

Acorn

Acorn

Gus Mueller’s venerable image editing app Acorn hit version 4.0 this year and to celebrate Gus is giving away a couple of copies to the folks that come away with the best photos from this year’s walk.

Additionally, Gus is offering up a discount code for Acorn to every other participant.

geotagbee

GeoTagBee

Engin Kurutepe is offering up a number of copies of his brand new app GeoTagBee. GeoTagBee is a simple iPhone app which records your location in the background and exports your trips as GPX files to your Dropbox or Email. These GPX files then can be used in Lightroom or Aperture to geotag your photos.

Engin has also hinted that he may bring one or two souvenirs from Berlin to give away to some lucky participants.

macphun_logo

The gents at MacPhun surprised us during last year’s walk by turning up and giving everyone a copy of their awesome photo editing app Snapheal. This year they’re back with more. In their own words:

MacPhun is one of the leading developers of photography applications for Mac and iOS. Their app Snapheal was named one of 2012 Best Mac App Store apps. And FX Photo Studio for iPhone (free for limited time) is about to pass 10 million downloads. MacPhun Team has a new photo app coming this summer and everyone who registers for the WWDC photo walk will get a free copy of it. The beta version of the app will be available to a limited number of photographers (and all those who sign up for the WWDC photo walk) later in June. Meanwhile you can get MacPhun’s Snapheal with a 40% discount. Check it here.

MoneyWell

MoneyWell

Let’s face it, photography gear is expensive and it takes discipline to save up your money for that next great lens and budget properly for all your other expenses.

Luckily No Thirst is here to help. Kevin Hoctor has generously offered up a free copy of MoneyWell for Mac to every walk participant.

MoneyWell is personal finance software that increases your wealth while reducing your debt. It does this by wrapping the tried and true envelope-budgeting system in a beautiful, modern interface.

If you’re not able to attend the walk then you should grab MoneyWell now, version 2.2 has just been released and is 22% off for 2.2 weeks. That makes it $38.99 until June 14, 2013.

Pixelmator

Pixelmator

Pixelmator has been a juggernaut in the Mac app scene and the folks on the Pixelmator team have been kind enough to offer up a free license to one lucky walk participant.

Pixelmator has been built exclusively for OS X and it shows. The latest version, 2.2 Blueberry, adds a ton of great features and they are showing no signs of slowing down.

Printzel

Printzel

Ordering high quality photo books directly from your iPad gets a huge step up with Printzel. This very cool app lets you take photos directly from your iPad’s photo collection and turn them into beautiful hard or soft cover books that will be delivered directly to your door.

Also ratcheting up the cool factor is the fact that they’ve also released an SDK that enables app developers to offer printed books right from within their own apps.

Every walk attendee will receive a 25%-off coupon code and 10 others will each receive a coupon for 100%-off their order!

Sequence

Sequence

Sequence is a very cool time lapse post-production app that takes the scores of images you make during a time lapse session and assembles them into a white-balanced, deflickered video.

A handful of lucky walk attendees will be walking away with free copies of Sequence this year thanks to the good people at Frosthaus.

[Original Post]

tl;dr version:

What: A photo walk during WWDC

When: Wednesday, June 12th from 6:15 – ?

Who: You, me, and all our friends.

Why: Because making photos is fun and doing it with a bunch of people has to be fun too, right?

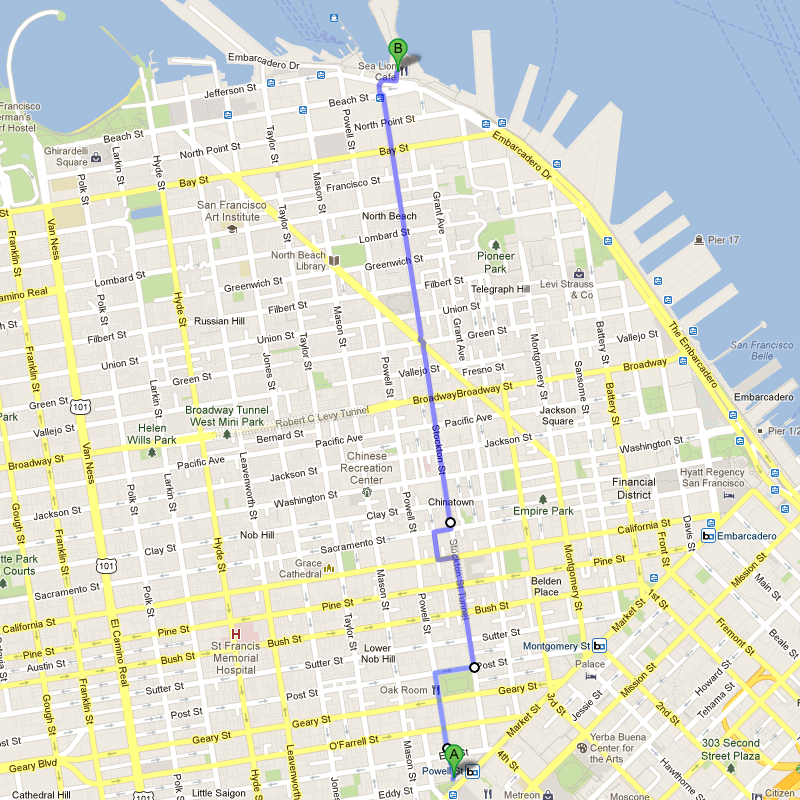
Where: From the Powell Street BART to Pier 39. Please note this is a longer walk this year (about 2 miles) with some decent uphill sections.

RSVP: Not required, but it’d be nice to hear that you’re coming. Send me a message on Twitter or an email to michael at this domain.

Connect: WWDCPhotoWalk on Twitter and App.net. We’re also running a Glassboard for this one, which I highly recommend you join: WWDC Photo Walk Glassboard.

The Long Winded Version

During WWDC we have an awesome opportunity to get together with other photo geeks and make some great photos of one of the coolest cities in the world. As such, I figured it would be cool to organize a photo walk. We’ll meet up on the street at the Powell Street BART at 6:15 on Wednesday, June 12th. There are usually a good number of street performers around so it should make for a great location to wait while everyone shows up. Shortly thereafter we’ll head north on Powell Street and head towards San Francisco’s famous Pier 39.

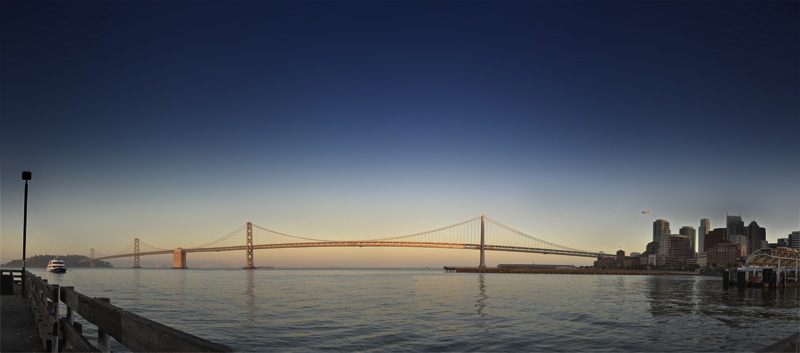
Sunset is at 8:32PM and if we time it right we should get some cool light to end the walk.

There’s no need to RSVP, but it’d be great to know if you’re coming so please send me a message on Twitter or an email to michael at this domain.

This year we’re going to be using Glassboard for any realtime communication once we’re all in San Francisco. If you need to get a hold of me in a time-sensitive way use the Glassboard, I will have all its push notifications turned on.

Powell Street BART to Pier 39

UITableView and NSFetchedResultsController: Updates Done Right

While working on MoneyWell Express 1.0 I decided to finally sit down and figure out a bug that had plagued me for a long time: Periodic and seemingly random crashes when updating MoneyWell’s transaction UITableView. If you’ve spent any significant time with UITableView you’ve undoubtably seen an error similar to this one:

*** Assertion failure in -[UITableView _endCellAnimationsWithContext:], /SourceCache/UIKit_Sim/UIKit-2380.17/UITableView.m:1070
CoreData: error: Serious application error.
An exception was caught from the delegate of NSFetchedResultsController during a call to -controllerDidChangeContent:.
Invalid update: invalid number of rows in section 2.
The number of rows contained in an existing section after the update (2) must be equal to the number of rows contained in that section before the update (1),
plus or minus the number of rows inserted or deleted from that section (0 inserted, 0 deleted) and
plus or minus the number of rows moved into or out of that section (0 moved in, 0 moved out). with userInfo (null)

The problem with this bug for me was that it was intermittent and never reliably reproducible – until it was. One day while working on our syncing framework I had this issue start to reproduce itself every time MoneyWell Express attempted to consume some sync changes and I seized the opportunity to finally figure out what was going on.

Let’s start by taking a look at the sample code Apple provides on the NSFetchedResultsControllerDelegate Protocol Reference:

1
2
3
4
5
6
7
8
9
10
11
12
13
14
15
16
17
18
19
20
21
22
23
24
25
26
27
28
29
30
31
32
33
34
35
36
37
38
39
40
41
42
43
44
45
46
47
48
49
50
51
52
/*
   Assume self has a property 'tableView' -- as is the case for an instance of a UITableViewController
   subclass -- and a method configureCell:atIndexPath: which updates the contents of a given cell
   with information from a managed object at the given index path in the fetched results controller.
 */

- (void)controllerWillChangeContent:(NSFetchedResultsController *)controller
{
    [self.tableView beginUpdates];
}

- (void)controller:(NSFetchedResultsController *)controller didChangeSection:(id )sectionInfo
    atIndex:(NSUInteger)sectionIndex forChangeType:(NSFetchedResultsChangeType)type
{
    switch (type) {
        case NSFetchedResultsChangeInsert:
            [self.tableView insertSections:[NSIndexSet indexSetWithIndex:sectionIndex] withRowAnimation:UITableViewRowAnimationFade];
            break;
        case NSFetchedResultsChangeDelete:
            [self.tableView deleteSections:[NSIndexSet indexSetWithIndex:sectionIndex] withRowAnimation:UITableViewRowAnimationFade];
            break;
    }
}

- (void)controller:(NSFetchedResultsController *)controller didChangeObject:(id)anObject atIndexPath:(NSIndexPath *)indexPath
          forChangeType:(NSFetchedResultsChangeType)type newIndexPath:(NSIndexPath *)newIndexPath
{
    UITableView *tableView = self.tableView;

    switch (type) {
        case NSFetchedResultsChangeInsert:
            [tableView insertRowsAtIndexPaths:[NSArray arrayWithObject:newIndexPath] withRowAnimation:UITableViewRowAnimationFade];
            break;
        case NSFetchedResultsChangeDelete:
            [tableView deleteRowsAtIndexPaths:[NSArray arrayWithObject:indexPath] withRowAnimation:UITableViewRowAnimationFade];
            break;

        case NSFetchedResultsChangeUpdate:
            [self configureCell:[tableView cellForRowAtIndexPath:indexPath] atIndexPath:indexPath];
            break;

        case NSFetchedResultsChangeMove:
            [tableView deleteRowsAtIndexPaths:[NSArray arrayWithObject:indexPath] withRowAnimation:UITableViewRowAnimationFade];
            [tableView insertRowsAtIndexPaths:[NSArray arrayWithObject:newIndexPath] withRowAnimation:UITableViewRowAnimationFade];
            break;
    }
}

- (void)controllerDidChangeContent:(NSFetchedResultsController *)controller
{
    [self.tableView endUpdates];
}

As you can see this code starts the tableView updates in controllerWillChangeContent:, responds to each change as it happens, and then ends the tableView updates in controllerDidChangeContent:. The problem I ran into with this code is that inserting sections into the table also inserted all the rows for that new section, but since those rows were also being reported as inserted we would get twice the number of rows inserted when adding a new section to the table. The answer was to queue up all the updates that the fetchedResultsController reported and then respond to them all at once, like so:

1
2
3
4
5
6
7
8
9
10
11
12
13
14
15
16
17
18
19
20
21
22
23
24
25
26
27
28
29
30
31
32
33
34
35
36
37
38
39
40
41
42
43
44
45
46
47
48
49
50
51
52
53
54
55
56
57
58
59
60
61
62
63
64
65
66
67
68
69
70
71
72
73
74
75
76
77
78
79
80
81
82
83
84
85
86
87
88
89
90
91
92
93
94
95
96
97
98
99
100
101
102
103
104
105
106
107
108
109
110
111
112
113
114
115
116
117
118
119
120
121
122
123
124
125
126
127
128
129
130
131
132
133
134
@interface SomeViewController ()

// Declare some collection properties to hold the various updates we might get from the NSFetchedResultsControllerDelegate
@property (nonatomic, strong) NSMutableIndexSet *deletedSectionIndexes;
@property (nonatomic, strong) NSMutableIndexSet *insertedSectionIndexes;
@property (nonatomic, strong) NSMutableArray *deletedRowIndexPaths;
@property (nonatomic, strong) NSMutableArray *insertedRowIndexPaths;
@property (nonatomic, strong) NSMutableArray *updatedRowIndexPaths;

@end

@implementation SomeViewController

#pragma mark - NSFetchedResultsControllerDelegate methods

- (void)controller:(NSFetchedResultsController *)controller didChangeObject:(id)anObject atIndexPath:(NSIndexPath *)indexPath
          forChangeType:(NSFetchedResultsChangeType)type newIndexPath:(NSIndexPath *)newIndexPath
{
    if (type == NSFetchedResultsChangeInsert) {
        if ([self.insertedSectionIndexes containsIndex:newIndexPath.section]) {
            // If we've already been told that we're adding a section for this inserted row we skip it since it will handled by the section insertion.
            return;
        }

        [self.insertedRowIndexPaths addObject:newIndexPath];
    } else if (type == NSFetchedResultsChangeDelete) {
        if ([self.deletedSectionIndexes containsIndex:indexPath.section]) {
            // If we've already been told that we're deleting a section for this deleted row we skip it since it will handled by the section deletion.
            return;
        }

        [self.deletedRowIndexPaths addObject:indexPath];
    } else if (type == NSFetchedResultsChangeMove) {
        if ([self.insertedSectionIndexes containsIndex:newIndexPath.section] == NO) {
            [self.insertedRowIndexPaths addObject:newIndexPath];
        }

        if ([self.deletedSectionIndexes containsIndex:indexPath.section] == NO) {
            [self.deletedRowIndexPaths addObject:indexPath];
        }
    } else if (type == NSFetchedResultsChangeUpdate) {
        [self.updatedRowIndexPaths addObject:indexPath];
    }
}

- (void)controller:(NSFetchedResultsController *)controller didChangeSection:(id )sectionInfo atIndex:(NSUInteger)sectionIndex
          forChangeType:(NSFetchedResultsChangeType)type
{
    switch (type) {
        case NSFetchedResultsChangeInsert:
            [self.insertedSectionIndexes addIndex:sectionIndex];
            break;
        case NSFetchedResultsChangeDelete:
            [self.deletedSectionIndexes addIndex:sectionIndex];
            break;
        default:
            ; // Shouldn't have a default
            break;
    }
}

- (void)controllerDidChangeContent:(NSFetchedResultsController *)controller
{
    [self.tableView beginUpdates];

    [self.tableView deleteSections:self.deletedSectionIndexes withRowAnimation:UITableViewRowAnimationAutomatic];
    [self.tableView insertSections:self.insertedSectionIndexes withRowAnimation:UITableViewRowAnimationAutomatic];

    [self.tableView deleteRowsAtIndexPaths:self.deletedRowIndexPaths withRowAnimation:UITableViewRowAnimationLeft];
    [self.tableView insertRowsAtIndexPaths:self.insertedRowIndexPaths withRowAnimation:UITableViewRowAnimationRight];
    [self.tableView reloadRowsAtIndexPaths:self.updatedRowIndexPaths withRowAnimation:UITableViewRowAnimationAutomatic];

    [self.tableView endUpdates];

    // nil out the collections so they are ready for their next use.
    self.insertedSectionIndexes = nil;
    self.deletedSectionIndexes = nil;
    self.deletedRowIndexPaths = nil;
    self.insertedRowIndexPaths = nil;
    self.updatedRowIndexPaths = nil;
}

#pragma mark - Overridden getters

/**
 * Lazily instantiate these collections.
 */

- (NSMutableIndexSet *)deletedSectionIndexes
{
    if (_deletedSectionIndexes == nil) {
        _deletedSectionIndexes = [[NSMutableIndexSet alloc] init];
    }

    return _deletedSectionIndexes;
}

- (NSMutableIndexSet *)insertedSectionIndexes
{
    if (_insertedSectionIndexes == nil) {
        _insertedSectionIndexes = [[NSMutableIndexSet alloc] init];
    }

    return _insertedSectionIndexes;
}

- (NSMutableArray *)deletedRowIndexPaths
{
    if (_deletedRowIndexPaths == nil) {
        _deletedRowIndexPaths = [[NSMutableArray alloc] init];
    }

    return _deletedRowIndexPaths;
}

- (NSMutableArray *)insertedRowIndexPaths
{
    if (_insertedRowIndexPaths == nil) {
        _insertedRowIndexPaths = [[NSMutableArray alloc] init];
    }

    return _insertedRowIndexPaths;
}

- (NSMutableArray *)updatedRowIndexPaths
{
    if (_updatedRowIndexPaths == nil) {
        _updatedRowIndexPaths = [[NSMutableArray alloc] init];
    }

    return _updatedRowIndexPaths;
}

@end

This implementation properly queues all the changes, makes sure not to insert or delete any rows when they are part of an inserted or deleted section, and updates the table in one nice little chunk. You don’t need to worry about implementing the willChangeContent: delegate method. It also has the benefit that, if you were so inclined, you could see how many updates you were about to perform on the tableView and just call reloadData instead, like so:

1
2
3
4
5
6
7
8
9
10
11
12
13
14
15
16
17
18
19
20
21
22
23
24
25
26
27
28
29
30
31
32
33
34
35
- (void)controllerDidChangeContent:(NSFetchedResultsController *)controller
{
    NSInteger totalChanges = [self.deletedSectionIndexes count] +
                             [self.insertedSectionIndexes count] +
                             [self.deletedRowIndexPaths count] +
                             [self.insertedRowIndexPaths count] +
                             [self.updatedRowIndexPaths count];
    if (totalChanges > 50) {
        self.insertedSectionIndexes = nil;
        self.deletedSectionIndexes = nil;
        self.deletedRowIndexPaths = nil;
        self.insertedRowIndexPaths = nil;
        self.updatedRowIndexPaths = nil;

        [self.tableView reloadData];
        return;
    }

    [self.tableView beginUpdates];

    [self.tableView deleteSections:self.deletedSectionIndexes withRowAnimation:UITableViewRowAnimationAutomatic];
    [self.tableView insertSections:self.insertedSectionIndexes withRowAnimation:UITableViewRowAnimationAutomatic];

    [self.tableView deleteRowsAtIndexPaths:self.deletedRowIndexPaths withRowAnimation:UITableViewRowAnimationLeft];
    [self.tableView insertRowsAtIndexPaths:self.insertedRowIndexPaths withRowAnimation:UITableViewRowAnimationRight];
    [self.tableView reloadRowsAtIndexPaths:self.updatedRowIndexPaths withRowAnimation:UITableViewRowAnimationAutomatic];

    [self.tableView endUpdates];

    self.insertedSectionIndexes = nil;
    self.deletedSectionIndexes = nil;
    self.deletedRowIndexPaths = nil;
    self.insertedRowIndexPaths = nil;
    self.updatedRowIndexPaths = nil;
}

If you’ve got any questions or if you notice some horrible bug that I’ve introduced let me know on Twitter or App.net, I’m MrRooni on both.

And if you’re the kind of person that likes gists, you can find the above code on GitHub here: https://gist.github.com/MrRooni/4988922

Quick and Easy Debugging of Unrecognized Selector Sent to Instance

It’s happened to all of us; we’re merrily trucking down the development road, building and testing our app when all of sudden everything grinds to a screeching halt and the console tells us something like:

–[MoneyWellAppDelegate doThatThingYouDo]: unrecognized selector sent to instance 0xa275230

Looking at the Xcode backtrace doesn’t seem to help either since it most likely looks like so:

At this point you start the hunt through your code looking to see who sent the -doThatThingYouDo message. You may find the answer right away and things may be all hunky dory, or you may spend the next hour trying to figure out where the hell that call is coming from.

The good news is there is a better way. All you need to do is pop over to the Breakpoint Navigator, click the + button at the bottom and choose Add Symbolic Breakpoint…

In the Symbol field enter this symbol:

-[NSObject(NSObject) doesNotRecognizeSelector:]

Now when any instance of any object within your program is sent a message to which it does not respond you will be presented with a backtrace that takes you right to the point where that message was sent.

Cheers and happy debugging.

XIBs, Container Views, and Auto Layout (Oh My)

While working on a major update for one of our products at No Thirst I ran across a small implementation question: In the world of auto layout, if you have a window whose subviews are managed by view controllers, what is the best way to layout these subviews? In the realm of springs and struts the answer is pretty straightforward: You add container views to your window, define their autoresizing masks in the XIB, add your view controller views as subviews of the container views in code, and set their frame sizes to match their container view frame sizes. As long as you set the autoresizing masks of the view controller views to be NSViewHeightSizable | NSViewWidthSizable in their XIBs you get the behavior you’re expecting and the code is pretty minimal.

This is the window we’re trying to create

If you try to follow a similar pattern while using auto layout and do most of your work in XIBs with very little code you hit a bit of a curve in the road. With springs and struts you set your autoresizing masks on individual views allowing you to define what each view controller’s view should do when added to a super view. Layout constraints (instances of NSLayoutConstraint) define relationships between views. This means that in order to create a layout constraint between two views both views need to be present at the time the relationship is defined. Thinking I could outsmart the system I had what I thought was a eureka moment. “Ah ha!” I thought, “I’ll follow the same pattern of using container views, but in each view controller’s awakeFromNib I’ll set up some constraints that mimic NSViewHeightSizable | NSViewWidthSizable. I’m a GENIUS!”

1
2
3
4
5
6
7
8
9
10
11
12
13
14
15
16
- (void)awakeFromNib
{
    NSDictionary *viewsDictionary = @{ @"view":self.view };

    NSArray *horizontalMaximizingConstraints = [NSLayoutConstraint constraintsWithVisualFormat:@"|[view]|"
                                                                                       options:0
                                                                                       metrics:nil
                                                                                         views:viewsDictionary];

    NSArray *verticalMaximizingConstraints = [NSLayoutConstraint constraintsWithVisualFormat:@"V:|[view]|"
                                                                                     options:0
                                                                                     metrics:nil
                                                                                       views:viewsDictionary];
    [self.view addConstraints:horizontalMaximizingConstraints];
    [self.view addConstraints:verticalMaximizingConstraints];
}

Uh, yeah, not so much:

2012-07-11 14:02:07.339 Shmet Bencher[15158:303] *** Terminating app due to uncaught
exception 'NSInvalidArgumentException', reason: 'Unable to parse constraint format:
Unable to interpret '|' character, because the related view doesn't have a superview
|[view]|
       ^'

Apparently there was a reason interface builder wouldn’t let me define those constraints visually.

Possible Solutions

As far as I can see there are two possible solutions to the original question:

  1. Follow the container view pattern. In your XIB you define the relationships between the container views and then in code you add your view controller views to those container views and set up constraints similar to the ones I posted above. The difference being that the | character will now represent a super view that actually exists.

  2. Skip container views, leave your XIB alone, add all your view controller views as direct subviews of the window and then define the relationships between them.

Option 1 is great because working with auto layout in interface builder allows you to see the immediate results of changing constraints. However, interface builder will also inject constraints into your layout as you’re working to try and make sure you don’t end up with an ambiguous layout or unsatisfiable constraints. Option 1 is also nice because the code you end up writing to add the view controller views to their containers essentially becomes boilerplate. Yes, there is a lot of it, but because of the nature of it, it’s easy to see when you’ve made a mistake.

Option 2 is great because you’ve reduced your view hierarchy and the constraints associated with each view were put there by you without interface builder getting in the way. Option 2 does suffer from the annoying side effects of having to write more code and not allowing you to play with your window size to see how constraints react until you’ve created a set of constraints that properly defines the layout for the entire window.

So what’s the answer?

The Answer

The answer, of course, is, “it depends”. According to Apple you should define your constraints using these methods, in descending order of preference:

  • Within interface builder

  • Using the visual format language in code (as I did above)

  • Individually using the constraintWithItem:attribute:relatedBy:toItem:attribute:multiplier:constant: class method on NSLayoutConstraint

In this particular case I’m going to charge forward with Option 2 and I will update this post if that turns out to be a horrible idea. If I had a mixture of other elements in this window like labels or other buttons I’d probably go for Option 1 but since it’s just views, and only a handful of them at that, I’m going to code it. However, for all of the view controller views I will be doing their layout in interface builder.

If you’ve got some feedback, typos to point out, or just want to type obscenities at me, you should get in touch with me via Twitter: @MrRooni

If any of the information above is misinformed or just plain wrong definitely get in touch.

WWDC 2012 Photo Walk Wrap-Up

The WWDC 2012 Photo Walk sponsored by 500px was a huge success! We had an incredible turnout that, quite honestly, blew me away.

As a last minute surprise we had the fine folks from Speck come out to demonstrate their upcoming CandyShell Focus case for iPhone 4 and iPhone 4S. To cap it all off they handed out a bunch of them to the attendees. I’ve had mine on my phone since the walk and I love it. I’ll admit I don’t do too much photography with my phone, but I have found myself using the stand for FaceTime calls and just for standing up the phone on my desk. If you’d like more info on it you should get in touch with Erica on Twitter @2bmighty, and tell her @MrRooni sent you. (Not for any good reason, but let’s be honest, it’s just fun to end a sentence with, “tell them I sent you”)

We also had the guys from MacPhun show up and very generously offer a free license to their new photography product, Snapheal, to everyone who attended. If you went on the walk and you’d like a copy of Snapheal just send an email to me (michael [at] this domain) and Alex Tsepko (atsepko [at] macphun) with your favorite photo from the walk. I haven’t actually had a chance to try it out yet, but I heard from a few people on the walk that use MacPhun’s other photography products and love them.

As you know, for those that participated in the walk, the editors at 500px are going to choose their two favorite photographs from the walk and upgrade those photographer’s accounts to Plus and Awesome. All you have to do is upload your photos to your 500px account and tag the photos with the tag wwdc-photowalk. The last day to upload your best shots for a chance to get your account upgraded is Thursday, June 21st TODAY. You can find my shots in a set on 500px here: WWDC 2012 Photo Walk sponsored by 500px. If you’d like to see all my photos from WWDC you can find them here: WWDC 2012

I know I mentioned it above, but we really did have a great turnout. So good in fact, that people are already asking me to organize one for next year. To that end I’ve created a new Twitter account dedicated to the walk: @WWDCPhotoWalk. You should follow that account for any and all info on the next walk.

Thank you to everyone who came out, you all exceeded my expectations, and I’ll see you next year.

What to Do if Your Sandboxed Application Shows Up as Not Sandboxed

This afternoon I started working on turning MoneyWell for Mac into a sandboxed application for our next major release. I watched the intro videos, checked the appropriate checkboxes in Xcode, ran MoneyWell, checked Activity Monitor and saw…

Well crap. After a bit of unsuccessful searching on the Apple Dev Forums I did some testing with Kevin Hoctor and discovered that the Release configuration of MoneyWell was properly sandboxed. The only significant difference between the Release and Debug configurations was that one was code signed and one was not. Once we enabled code signing for the Debug configuration MoneyWell launched as a sandboxed app.

I asked on Twitter,

Is it common knowledge that an app that is not code signed will run in non-sandboxed mode even with sandboxing enabled?

Both Brian Webster and Jim Correia got back to me:

@bwebsterThat does make sense, since it is the code sign tool that’s used to encode the sandbox entitlements when building.

@jimcorreiaThe app-sandbox is an entitlement. Entitlements are embedded in the code signature.

Hopefully this helps you out if you find that your sandboxed app is showing up as not sandboxed.